Brief on Kubernetes
Microservices are encapsulated in containers, which are increasingly used to deploy modern applications. In this environment, Kubernetes is a portable, extensible, open-source platform for the management of containerized workloads and services, with a framework for the resilient operation of distributed systems. It's a service that addresses your performance needs, failover, deployment patterns, scaling, load balancing, logging and monitoring as well. But, instead of being operated at the hardware level, it is operating at the container level.
The need for shell access in Kubernetes
If you are debugging an issue, it is possible to save considerable time by accessing pods and nodes in a Kubernetes cluster. This allows developers and operators to view the environment of a running container, see its logs or diagnose any problems using shell access. Most of the time, containers require some custom configuration, and shell access allows you to modify files or settings directly in the container.
Introduction to kubectl exec
Connecting to a running container is very important as you need to view logs, verify processes, mount points, environment variables and package versions, among other things. kubectl exec will give you full shell access to the container, so modifying it and installing packages that are not part of the container image is possible but is not recommended unless for temporary troubleshooting purposes.
Diving into kubectl exec
Understanding the Key Components and Parameters of the kubectl exec Command:
The kubectl exec command allows you to execute commands inside a container within a Kubernetes Pod. Let's go over the syntax in more detail:
kubectl exec [OPTIONS] NAME_OF_POD -- COMMAND [ARGUMENTS]
Key Components:
• kubectl is a Kubernetes command line tool and exec used for executing commands in a container.
Parameters:
• [OPTIONS] is a flag that can be used to modify how kubectl exec behaves. For Example, you can use the -it flag to run a command in interactive mode.
• NAME_OF_POD represents the name of the pod that contains the container in which you want to run commands.
• The double dashes -- indicate that all the arguments following this should be commands that will run inside the container.
• COMMAND that comes after the dashes is the actual command that you want to run inside the container.
• [ARGUMENTS] are specific parameters to pass to the command you run inside the container.
Comparison with docker exec and ssh
The kubectl exec service is based on the Kubernetes RBAC for security, and it works with containers in your Kubernetes pod. docker exec is running on a Docker level, interacting with containers directly and requiring access to the Docker daemon. SSH, which is a widely used tool for securing access to remote systems and functioning at the level of an Operating System, provides secure authentication by way of encryption keys.
Practical Examples
Basic usage
Let's suppose you have an nginx Pod running, and you are curious to see the current date and time in that container environment. It is as simple to fetch the information using kubectl exec as:
kubectl exec my-demo-pod -- date
In the above command, 'my-demo-pod' is the name of the pod and 'date' is the command that kubectl will run inside the container. It will return the following output:

Let's take another basic example of accessing the container shell interactively, as it allows the container's filesystem, processes and other aspects to be explored directly via this interface. In order to achieve this purpose, we can use the command below:
kubectl exec -it my-demo-pod -- /bin/bash
In the above command, my-demo-pod remains the pod name and /bin/bash runs inside the container for accessing the bash shell. The -it flags make it appear as though you are inside the container by making sure the session is interactive (-i) and allocating a pseudo-terminal (-t).

Executing specific shell commands
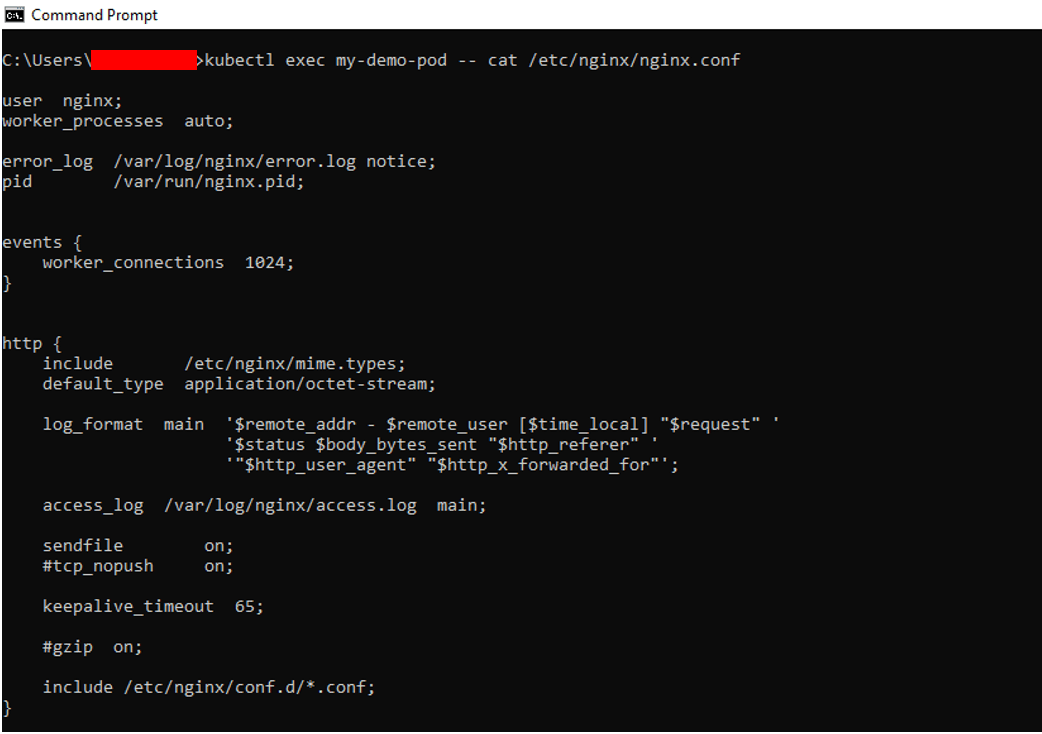
Let's suppose we want to view nginx container configurations using shell commands. The following kubectl exec command will allow us to execute the shell command directly into the container:
kubectl exec my-demo-pod -- cat /etc/nginx/nginx.conf

Similarly, to look at content in the Nginx web root directory through a shell command, which can give information about hosted web pages or assets, we can utilize the capability of `kubectl exec`` to list the content of a particular directory:
kubectl exec my-demo-pod -- ls /usr/share/nginx/html

Interacting with multi-container pods
Pods in Kubernetes are capable of hosting more than one container and working together for a specific purpose. Sometimes, within such a multi-container pod, you might need to interact with a specific container. For this purpose, the kubectl exec utility will be helpful in specifying a container you wish to interact with.
To run the command inside the specific container, you need to follow the syntax below:
kubectl exec -it [NAME_OF_POD] -c [NAME_OF_CONTAINER] -- [COMMAND]
Let's say we have a multi-container pod named my-demo-pod that contains both nginx and redis containers. We are required to access the command shell of the nginx container and inspect the logs of the `redis`` container.
By running the command below, we can access the nginx container shell:
kubectl exec -it my-demo-pod -c nginx -- /bin/sh

To check the redis version in a pod with multiple containers, we can run this command:
kubectl exec my-demo-pod -c redis -- redis-cli –version
Advanced techniques with kubectl exec
Transfer Multiple Files between Pod and Local Machine:
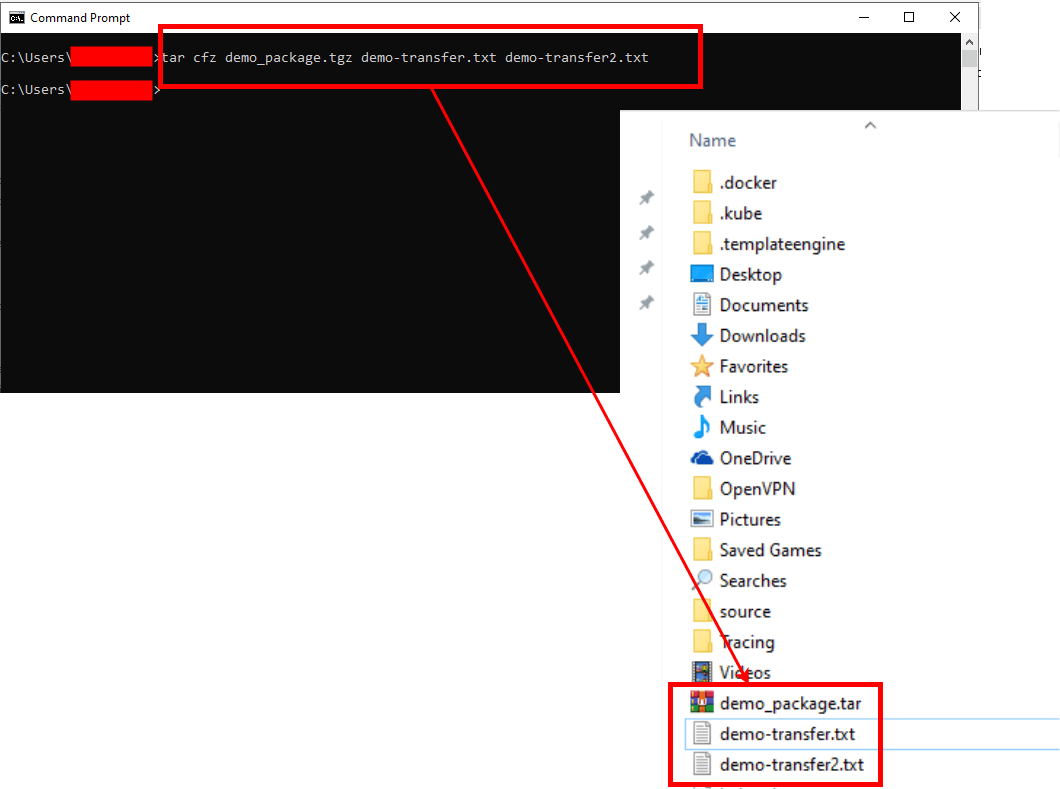
Let's suppose that we want to transfer demo-transfer.txt and demo-transfer2.txt files to the nginx container in our multi-container pod. kubectl exec with tar allows more precise and effective transfers as compared to kubectl cp. So, first, we need to package both files into a tarball named demo_package.tar by running the following command:
tar cf demo_package.tar demo-transfer.txt demo-transfer2.txt

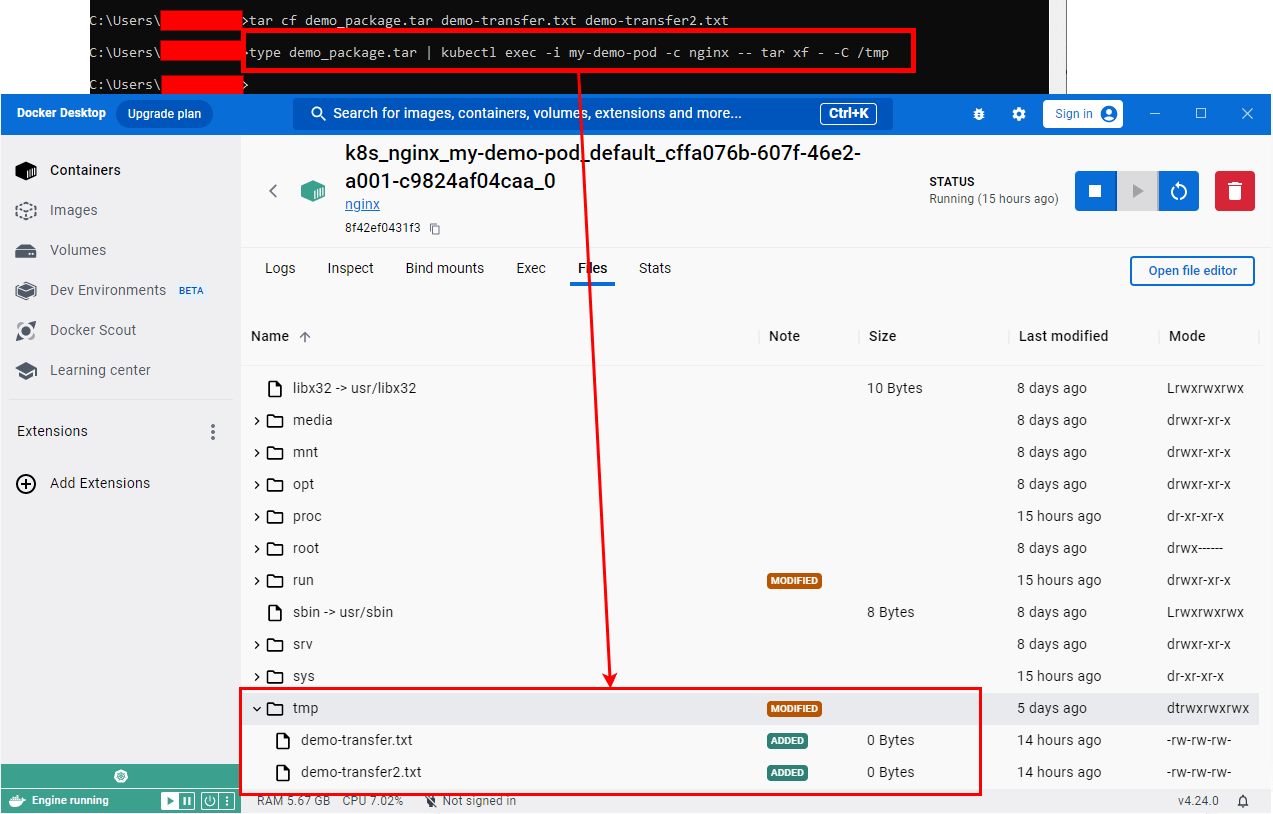
Once we have packaged both files, we can run the command below to move them from the local machine to the /tmp folder in the nginx container:
type demo_package.tar | kubectl exec -i my-demo-pod -c nginx -- /bin/sh -c 'tar xf - -C /tmp'
- The
tar xf - -C /tmpcommand inside the pod's container will extract the tarball content streamed to its stdin into the/tmpdirectory. - The
cat demo_package.tgz |part sends the content of the tarball to the kubectl exec command.

Interacting with Databases
In order to interact with databases that are located in your cluster, you can use kubectl exec. For Example, in a container running Redis, you can access the Redis CLI by running the command below:
kubectl exec -it my-demo-pod -c redis -- redis-cli

Security Implications
Best practices for secure usage
Restrict 'kubectl exec' Commands: It is possible to restrict or even prevent the use of exec commands for specific pods by using an admission controller. In order to protect crucial or sensitive Pods, this may be particularly useful. Utilise TLS Verification: When using kubectl exec, you can prevent attacks by specifying certificate authority files for TLS verification. Mandatory Authentication: Use client certificates and keys to authenticate users before they can execute commands in containers to enhance security.
Monitoring and logging exec activities
- Make sure the kubectl exec activity is checked on a regular basis. Suspecting behavior can be detected by unexpected or unknown commands.
- Ensure that all executive activities are recorded. The output of a log can help detect an attempt to gain unauthorized access or the use of inappropriate commands.
Access control and RBAC
RBAC Implementation: If you limit the number of users and entities who can run kubectl exec using Role Based Access Control, then this will be helpful to prevent the event of accidental misuse or deliberate infringement. Permissions: Make sure that users and service accounts are assigned only the necessary permissions. There is a decrease in the risk of misuse when permissions are limited.
Troubleshooting kubectl exec
Common errors and their solutions
CrashLoopBackOff Error:
The CrashLoopBackOff indicates that the Kubernetes service has failed to schedule a pod in most cases due to insufficient node resources, any application errors or an issue with volume mounting. To resolve this error, you need to ensure the correct configurations, adequate resources, validate your volume manifest or fix application errors. You can identify this error by running the command below, and the output shows the status of CrashLoopBackOff against the affected pod:
kubectl get pods

ImagePullBackOff Error:
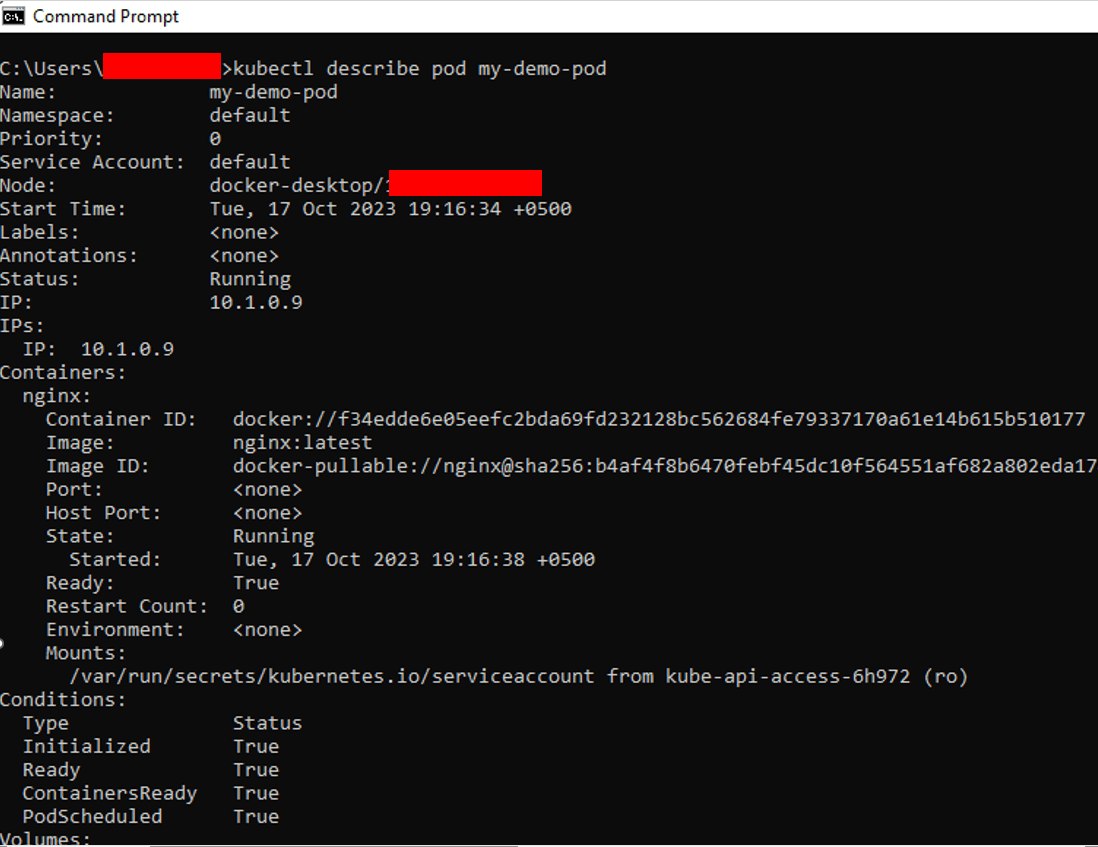
If Pods cannot generate the required container image, it is one of the more common issues. This may be because of a number of factors, e.g., an invalid name for the image, not being able to render it or problems with authentication. You can use the following command to check for issues like "no pull access," "Manifest not found," or "authorization failed" in the Events section of output:
kubectl describe pod my-demo-pod

Tools and techniques for debugging
- Often, the first step in troubleshooting is to see your pod's logs. To obtain container logs and analyze them for messages of errors or abnormal behavior, run the
kubectl logcommand. - In order to find detailed information about a container, including all events or warnings recorded by Kubernetes, use the
kubectl describe podcommand. - The
kubectl-debugtool also provides improved debugging capabilities. Using the commandkubectl debug [NAME_OF_POD] -it --image=[Debugging_Tool_Image]you can start a debugging session on a problematic pod.
Keep in mind that kubectl-debug is an extension and needs to be installed separately.[Debugging_Tool_Image]is a container image that has the necessary debugging tools installed. For Example, you can use a debug image that offers tools such as ping, netstat, curl and nslookup if you are trying to look at some kind of pod with network problems.
Conclusion & Best Practices
Recap and takeaways
Tools such as kubectl exec allow Kubernetes to efficiently control containerized workloads, allowing for detailed pod interaction, which is of critical importance when it comes to resolving problems. Though its capabilities are enormous, it's vital to prioritize safety. In order to maintain a secure environment, a few measures must be taken that restrict the application of commands, such as TLS verification, user authentication and Role Based Access Control.
Further resources and learning
You can learn more about Kubernetes, further your knowledge and keep up to date on the best practices of container orchestration by reading articles, workshops or courses. Just like kubectl-debug, you can explore other extensions as well.

